- Briefing
- Prepare SSH Key
- Buy 4 hosts
- Pre configuration
- Install CDH (Cloudera Distribution Including Apache Hadoop)
- Install Java 8 & Spark 2 (If you only use spark 1, ignore these steps)
- For python user (If you only use Scala, you can ignore these steps)
- Store a image copy, for secure..
- Done !!!
Briefing
If you want to use it in production environment, please aware of the security configuration. The front few steps you can refer to this video: Youtube Video Here we use digital ocean as it’s cheap, if you use any IAAS platform as AWS, ALICLOUD, should be similar.
Prepare SSH Key
- Create your ssh key as this instruction by digital ocean
- I’m using Mac OS, I throw my ssh key as file ~/.ssh/id_rsa.
Buy 4 hosts
- Create digital ocean account
- Key in your credit card information.
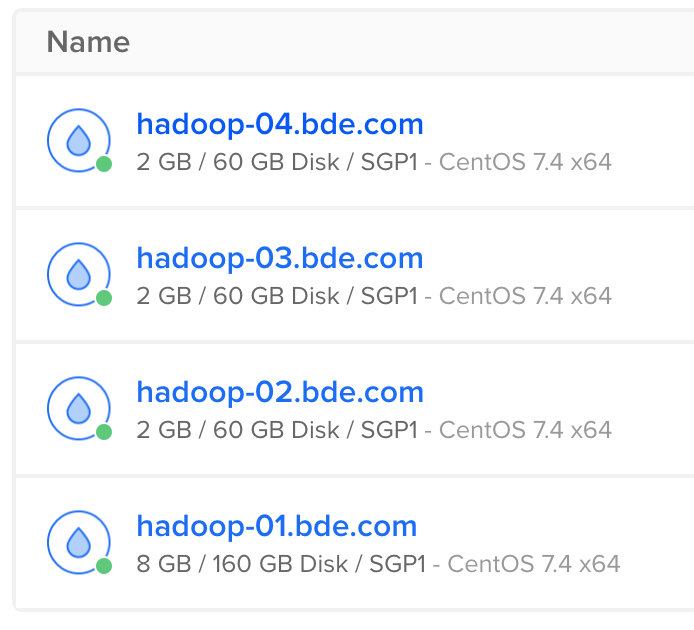
- Go to Main page -> Create -> Droplets -> choose CentOS -> one 8GB & three 2GB -> use the ssh key just created.

** Record down your IP **
159.65.135.11 hadoop-01.bde.com hadoop-01
206.189.36.21 hadoop-02.bde.com hadoop-02
206.189.42.80 hadoop-03.bde.com hadoop-03
206.189.40.146 hadoop-04.bde.com hadoop-04
Pre configuration
Modify the configuration on these four hosts, also you can modify your machine also.
ssh root@hadoop-01.bde.com
# Config Host
vi /etc/hosts
	# remove the self point ...
	# add the above IP Hostname mapping.
	# After configuration, looks like:
		# The following lines are desirable for IPv4 capable hosts
		127.0.0.1 localhost.localdomain localhost
		127.0.0.1 localhost4.localdomain4 localhost4

		# The following lines are desirable for IPv6 capable hosts
		::1 localhost.localdomain localhost
		::1 localhost6.localdomain6 localhost6

		159.65.135.11 hadoop-01.bde.com hadoop-01
		206.189.36.21 hadoop-02.bde.com hadoop-02
		206.189.42.80 hadoop-03.bde.com hadoop-03
		206.189.40.146 hadoop-04.bde.com hadoop-04

vi /etc/selinux/config
	SELINUX=disabled

reboot
ssh root@hadoop-02.bde.com
...
ssh root@hadoop-03.bde.com
...
ssh root@hadoop-04.bde.com
...
vi /etc/hosts
Install CDH (Cloudera Distribution Including Apache Hadoop)
Install CHD
ssh root@hadoop-01.bde.com
yum install wget
wget http://archive.cloudera.com/cm5/installer/latest/cloudera-manager-installer.bin
chmod +x cloudera-manager-installer.bin
./cloudera-manager-installer.bin
# Just click 'accept'
Configure CDH
Wait for a while, let it start the CDH manager, use your own browser, go to http://hadoop-01.bde.com:7180/
Use ‘admin / admin’ login, a wizard will take you initial the whole CDH cluster.
You can use the default setting for most configuraitons. Some special listed down:
- Specify hosts for your CDH cluster installation.
hadoop-0[1-4].bde.com -
Provide Login Credentials Use our ssh key created just now.
- Select Services I choose the Core with Spark, you can choose others
After we finish the wizard above
At 7180,click YARN - configuration - search Container Memory
Set yarn.nodemanager.resource.memory-mb to ‘1.5GB’
Set yarn.scheduler.maximum-allocation-mb to ‘1.5GB’
Distrubute this configuration, click the button as a file beside the power button.
Enable password login
Let your data scientist / algrithm engineer use the HDFS role !!! Don’t give the root role to them ..
vi /etc/ssh/sshd_config
    # To disable tunneled clear text passwords, change to no here!
	#PasswordAuthentication yes
	PermitEmptyPasswords no
	PasswordAuthentication yes
Try login with hdfs
ssh hdfs@hadoop-01.bde.com
	password: hdfs
Good, we have start up a hadoop cluster !
Install Java 8 & Spark 2 (If you only use spark 1, ignore these steps)
Install Java 8 (Spark2 dependency), Cloudera Official Instruction
1. At 7180, stop Cluster all services
2. At 7180, stop Cloudera Management Service
3. Hadoop-01 terminal:
	service cloudera-scm-agent stop
	service cloudera-scm-server stop
4. In all four hosts, run below commands:
	yum install wget
	cd /usr/java
	wget --no-cookies --no-check-certificate --header "Cookie: gpw_e24=http%3A%2F%2Fwww.oracle.com%2F; oraclelicense=accept-securebackup-cookie" "http://download.oracle.com/otn-pub/java/jdk/8u171-b11/512cd62ec5174c3487ac17c61aaa89e8/jdk-8u171-linux-x64.tar.gz"
	tar xzf jdk-8u171-linux-x64.tar.gz
	rm -rf jdk-8u171-linux-x64.tar.gz
5. Back to Hadoop-01 terminal:
	vi /etc/default/cloudera-scm-server
	Add: **export JAVA_HOME=/usr/java/jdk1.8.0_171**

	Run commands:
	service cloudera-scm-server start
	service cloudera-scm-agent start
6. Wait for the server start up, at 7180,Hosts -> configure -> Java Home Directory, put /usr/java/jdk1.8.0_171
7. At 7180,start Cluster all services
8. At 7180,start Cloudera Management Service
Install Spark2,Cloudera Offical Link
cd
wget http://archive.cloudera.com/spark2/csd/SPARK2_ON_YARN-2.3.0.cloudera2.jar
mv SPARK2_ON_YARN-2.3.0.cloudera2.jar /opt/cloudera/csd
chmod 644 /opt/cloudera/csd/SPARK2_ON_YARN-2.3.0.cloudera2.jar
service cloudera-scm-server restart

Wait for 7180 restart,there is a gift shape icon on the top right corner, click it, you can see spark2 in the list,click **download-Distribute-Active**.
Suggest click configuration and reselect **Validate Parcel Relations**
Restart the whole cluster
At 7180,Add service -> Spark2, depend on YARN。
History server select 'hadoop-01', gateway select all, countine.
At 7180,stop spark,remove spark,choose None to both selection.
Go to Hadoop-01 terminal
	mkdir /var/log/spark2/lineage
	chmod 777 /var/log/spark2/lineage
	(Seems a new function for 2.3, simple debug here only ...)
Try Spark2
1. Switch to hdfs user
	su hdfs
	cd
2. Put a file into HDFS system
	vi purplecow.txt
	then write something.
	hadoop fs -put purplecow.txt .
3. Try spark2-shell
	export JAVA_HOME=/usr/java/jdk1.8.0_171
	spark2-shell
	>>  sc.textFile("purplecow.txt").count()
4. Try pyspark2
	JAVA_HOME=/usr/java/jdk1.8.0_171 pyspark2
	>> sc.textFile("purplecow.txt").count()
5. Exit
	Control + D
	exit
For python user (If you only use Scala, you can ignore these steps)
Install pyspark + juptyer notebook
python --version
curl "https://bootstrap.pypa.io/get-pip.py" -o "get-pip.py"
python get-pip.py
yum install python-devel
yum groupinstall "Development tools"
pip install jupyter
pip install findspark
Run jupyter
export PYSPARK_PYTHON=/usr/bin/python
export HADOOP_USER_NAME=hdfs
export SPARK_HOME=/opt/cloudera/parcels/SPARK2-2.3.0.cloudera2-1.cdh5.13.3.p0.316101/lib/spark2
export JAVA_HOME=/usr/java/jdk1.8.0_171
jupyter notebook --ip=159.65.135.11 --port=80 --allow-root &
Try jupyter,Sample 1, Sample 2
import findspark
findspark.init()
from pyspark.sql import SparkSession

sparkSession = SparkSession.builder.appName("example-pyspark-read-and-write").getOrCreate()
data = [('First', 1), ('Second', 2), ('Third', 3), ('Fourth', 4), ('Fifth', 5)]
df = sparkSession.createDataFrame(data)

# Write into HDFS
df.write.csv("example.csv")

# Read from HDFS
df_load = sparkSession.read.csv('example.csv')
df_load.show()
Store a image copy, for secure..
DigitalOcean main page -> Image -> create Snapshot
Done !!!
Take a rest ~